Spring Support
A lot has changed since the initial Jolokia release in 2011 (version 1.0.0). While Spring Framework was already popular back then, in the meantime we’ve observed a general shift away from XML into Java and annotation-based configuration.
Spring Framework is also the fundament on which Spring Boot was built and released as version 1.0 in 2014.
Support for Jolokia in Spring Boot
Jolokia support was added to Spring Boot version 0.5.0. It was Jolokia 1.1.5.
Jolokia integration with Spring Boot is based on the concept of actuator and when Spring Boot detects Jolokia libraries on the CLASSPATH, special /actuator/jolokia endpoint becomes available.
Spring Boot finds and processes the so-called auto-configurations using a mechanism described in the Locating Auto-configuration Candidates chapter of Spring Boot documentation.
With this mechanism, Jolokia was simply providing an implementation of Agent Servlet and Spring Boot was doing the rest.
However, Spring Boot 3, which moved to JDK 17 and JakartaEE 9+ removed support for Jolokia in the sense, that it no longer included auto-configuration for Jolokia. See this issue for more details.
| An attempt to bring back Spring Boot 3 support for Jolokia 2 was closed, with a good explanation. |
Because Spring Boot (and Spring Framework) no longer provides auto-configuration for Jolokia and Spring Boot BOM no longer includes a dependency for Jolokia we had to add this _auto-configuration mechanism to Jolokia itself.
The benefit is that users who want to use Jolokia with Spring Boot can simply use the latest (supported) version of Spring Boot and Jolokia.
Starting with Jolokia 2.5.0 we provide two modules:
-
org.jolokia:jolokia-support-springboot3for using Jolokia with Spring Boot 3.x -
org.jolokia:jolokia-support-springbootfor using Jolokia with Spring Boot 4.x
Before Jolokia 2.5.0 there was only one module for Spring Boot 3 and (for legacy reasons) it was just called org.jolokia:jolokia-support-spring.
|
Both modules declare Spring dependencies with provided scope, so it’s up to the user to add proper Spring dependencies. Here are the templates:
<dependencyManagement>
  <dependencies>
    <dependency>
      <groupId>org.jolokia</groupId>
      <artifactId>jolokia-bom</artifactId>
      <version>2.6.0</version>
      <type>pom</type>
      <scope>import</scope>
    </dependency>
    <dependency>
      <groupId>org.springframework.boot</groupId>
      <artifactId>spring-boot-dependencies</artifactId>
      <version>${spring-boot-4-version}</version>
      <type>pom</type>
      <scope>import</scope>
    </dependency>
  </dependencies>
</dependencyManagement>

<dependencies>
  <dependency>
    <groupId>org.jolokia</groupId>
    <artifactId>jolokia-support-springboot</artifactId>
  </dependency>
  <dependency>
    <groupId>org.springframework.boot</groupId>
    <artifactId>spring-boot-autoconfigure</artifactId>
  </dependency>
  <dependency>
    <groupId>org.springframework.boot</groupId>
    <artifactId>spring-boot-actuator-autoconfigure</artifactId>
  </dependency>
  <dependency>
    <groupId>org.springframework.boot</groupId>
    <artifactId>spring-boot-starter-webmvc</artifactId>
  </dependency>
  <!-- other Spring Boot starters and dependencies -->
</dependencies><dependencyManagement>
<dependencies>
<dependency>
<groupId>org.jolokia</groupId>
<artifactId>jolokia-bom</artifactId>
<version>2.6.0</version>
<type>pom</type>
<scope>import</scope>
</dependency>
<dependency>
<groupId>org.springframework.boot</groupId>
<artifactId>spring-boot-dependencies</artifactId>
<version>${spring-boot-3-version}</version>
<type>pom</type>
<scope>import</scope>
</dependency>
</dependencies>
</dependencyManagement>
<dependencies>
<dependency>
<groupId>org.jolokia</groupId>
<artifactId>jolokia-support-springboot3</artifactId>
</dependency>
<dependency>
<groupId>org.springframework.boot</groupId>
<artifactId>spring-boot-autoconfigure</artifactId>
</dependency>
<dependency>
<groupId>org.springframework.boot</groupId>
<artifactId>spring-boot-actuator-autoconfigure</artifactId>
</dependency>
<dependency>
<groupId>org.springframework.boot</groupId>
<artifactId>spring-boot-starter-web</artifactId>
</dependency>
<!-- other Spring Boot starters and dependencies -->
</dependencies>Jolokia provides 6 examples related to Spring:
-
jolokia-example-spring6- using Jolokia with Spring Framework 6 (no Spring Boot) -
jolokia-example-spring7- using Jolokia with Spring Framework 6 (no Spring Boot) -
jolokia-example-springboot3- using Jolokia with Spring Boot 3 and Spring Web MVC -
jolokia-example-springboot4- using Jolokia with Spring Boot 4 and Spring Web MVC -
jolokia-example-springboot3-actuator- using Jolokia with Spring Boot 3 and actuator endpoint -
jolokia-example-springboot4-actuator- using Jolokia with Spring Boot 4 and actuator endpoint
Using Jolokia with Spring
| This section is valid both for Spring Boot 3 and Spring Boot 4. The details are internal and are related to Spring Boot 4 modularization. |
It’s beyond the scope of this chapter to provide information about how to develop or configure applications using Spring Boot. Spring guides are the best source for developers.
The below sections present programmer’s details about how to use Jolokia with Spring Boot and Spring Framework alone. Normally it’s enough to use the above Maven dependencies and Jolokia will be started correctly. But we may also want to declare the Spring beans ourselves.
Registering Agent servlet as Spring bean
Servlets, Filters, and Listeners can be registered directly as @Bean annotated beans and Spring Boot will register them directly into embedded servlet container.
In the simplest form we could use:
@Configuration
public class AppConfig {

  @Bean
  public AgentServlet jolokia() {
    return new AgentServlet();
  }

}
However without a way to specify URL mapping we may conflict with registration of Spring’s own DispatcherServlet.
This is why it’s better to declare beans of org.springframework.boot.web.servlet.ServletRegistrationBean class:
@Configuration
public class AppConfig {

  @Bean
  public ServletRegistrationBean<AgentServlet> jolokia() {
    ServletRegistrationBean<AgentServlet> jolokiaServlet = new ServletRegistrationBean<>(new AgentServlet(), "/jolokia/*");
    jolokiaServlet.setLoadOnStartup(0);
    jolokiaServlet.setAsyncSupported(true);
    jolokiaServlet.setInitParameters(Map.of(ConfigKey.DEBUG.getKeyValue(), "true"));
    jolokiaServlet.setInitParameters(Map.of(ConfigKey.AGENT_DESCRIPTION.getKeyValue(), "Spring Servlet Jolokia Agent"));
    return jolokiaServlet;
  }

}
This is enough for Spring Boot with org.springframework.boot:spring-boot-starter-web starter to register Jolokia Servlet under /jolokia/* mapping.
Registering Agent servlet under Spring Boot actuator
To let Jolokia be registered as an actuator endpoint, we can simply run a Spring Boot application without any Jolokia bean configuration. This is entire main() method:
@SpringBootApplication
public class Application {
public static void main(String[] args) {
SpringApplication.run(Application.class);
}
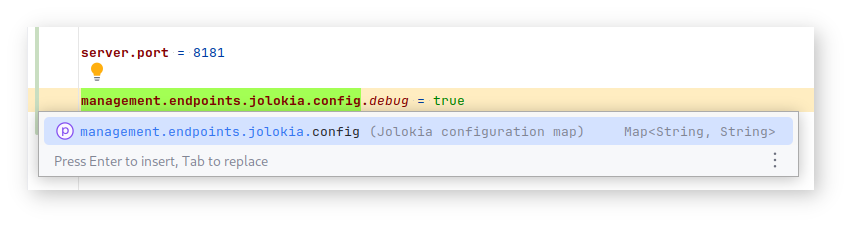
}And this is the application.properties configuration file:
server.port = 8181

management.endpoint.jolokia.config.debug = true
management.endpoint.jolokia.config.agentDescription = Jolokia Spring Boot Actuator agent

management.endpoints.web.exposure.include = health, jolokia
Since Jolokia 2.2.9, we can also have a @Bean that declares org.jolokia.server.core.service.api.Restrictor to be used by Jolokia Agent servlet:
@Bean
public Restrictor customRestrictor() {
    return new CustomReestrictor(...);
}
We can also still use the default location from which the restrictor XML config is loaded, which is classpath:/jolokia-access.xml. Please refer to Security for more information about the Jolokia restrictor.
We may now access Jolokia Agent using http://localhost:8181/actuator/jolokia URL:
$ curl -s 'http://localhost:8181/actuator/jolokia' | jq .
{
  "request": {
    "type": "version"
  },
  "value": {
    "agent": "2.6.0",
    "protocol": "8.1",
    "decorators": {},
    "details": {
      "agent_version": "2.6.0",
      "agent_id": "192.168.0.166-213501-93e80ea-servlet",
      "agent_description": "Jolokia Spring Boot Actuator agent",
      "secured": false,
      "url": "http://192.168.0.166:8181/actuator/jolokia"
    },
    "id": "192.168.0.166-213501-93e80ea-servlet",
    "config": {
      "agentId": "192.168.0.166-213501-93e80ea-servlet",
      "debug": "true",
      "dateFormat": "yyyy-MM-dd'T'HH:mm:ss.SSSSSSSSSXXX",
      "agentDescription": "Jolokia Spring Boot Actuator agent"
    },
    "info": {
      "proxy": {},
      "jmx": {}
    }
  },
  "status": 200,
  "timestamp": 1770213286
}
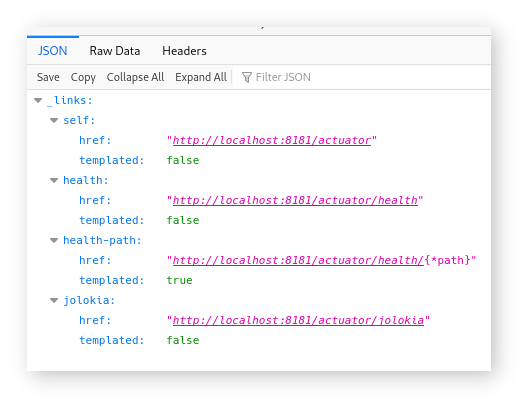
/jolokia actuator is listed under http://localhost:8181/actuator:
What’s more, with IDE support, Jolokia configuration properties are suggested:
Using Jolokia without Spring Boot
Support for integrating Jolokia with Spring Framework alone is provided using XML Schema Authoring.
Using custom XML Schema available here we can author Spring XML configuration files where Jolokia agent can easily be declared.
Here’s an example Spring XML configuration which starts the org.jolokia.support.spring.SpringJolokiaAgent (an extension of Jolokia JVM Agent's org.jolokia.jvmagent.JolokiaServer). This agent
uses JDK’s own HTTP Server which comes with OpenJDK/Oracle JVMs (Version 1.6 or later).
<beans xmlns="http://www.springframework.org/schema/beans"
       xmlns:xsi="http://www.w3.org/2001/XMLSchema-instance"
       xmlns:jolokia="http://www.jolokia.org/jolokia-spring/schema/config"
       xsi:schemaLocation="
           http://www.springframework.org/schema/beans
           https://www.springframework.org/schema/beans/spring-beans.xsd
           http://www.jolokia.org/jolokia-spring/schema/config
           https://www.jolokia.org/jolokia-config.xsd">

  <jolokia:agent lookupConfig="false" systemPropertiesMode="never">
    <jolokia:config autoStart="true" host="0.0.0.0" port="8778" .... />
  </jolokia:agent>

</beans>Just in case you don’t want to use the Jolokia Spring namespace you can also use plain beans to configure a JVM agent. The following examples show the same scenario as above with only base Spring bean configurations (including an Spring EL expression):
<beans xmlns="http://www.springframework.org/schema/beans"
       xmlns:xsi="http://www.w3.org/2001/XMLSchema-instance"
       xmlns:context="http://www.springframework.org/schema/context"
       xmlns:util="http://www.springframework.org/schema/util"
       xsi:schemaLocation="
           http://www.springframework.org/schema/beans
           https://www.springframework.org/schema/beans/spring-beans.xsd
           http://www.springframework.org/schema/context
           https://www.springframework.org/schema/context/spring-context.xsd
           http://www.springframework.org/schema/util
           https://www.springframework.org/schema/util/spring-util.xsd">

  <util:map id="configuration">
    <entry key="jmx.jolokiaPort" value="8778"/>
  </util:map>

  <bean name="server" id="jolokia" class="org.jolokia.support.spring.SpringJolokiaAgent">
    <property name="lookupConfig" value="false"/>
    <property name="systemPropertiesMode" value="never"/>
    <property name="config">
      <bean class="org.jolokia.support.spring.SpringJolokiaConfigHolder">
        <property name="config">
          <util:map>
            <entry key="autoStart" value="true"/>
            <entry key="host" value="0.0.0.0"/>
            <entry key="port" value="#{configuration['jmx.jolokiaPort']}"/>
          </util:map>
        </property>
      </bean>
    </property>
  </bean>

</beans>
This style is not recommended, as Jolokia configuration namespace is much easier to read.
Jolokia custom XML Schema supports few top-level elements which are described next.
An example of application based on pure Spring Framework is available at examples/spring7 in Jolokia GitHub repository.
<jolokia:agent>
<jolokia:agent> declares a Jolokia server with a configuration as defined in an embedded <jolokia:config> configuration section.
Supported attributes are:
| Name | Description | Default value |
|---|---|---|
|
If set to |
|
|
If set to |
|
|
Specifies how system properties with
|
|
|
If set to |
|
<jolokia:agent> element may contain child <jolokia:config> element that can be used to configure the agent in-place.
<jolokia:config> takes as attributes all
the configuration parameters for the JVM agent as described in
JVM agent configuration options. In addition, there is an extra
attribute autoStart which allows for
automatically starting the HTTP server during the initialization
of the application context. By default this is set to
true, so the server starts up automatically. <jolokia:config> has an
order attribute, which determines the
config merge order: The higher order configs will be merged
later and hence will override conflicting parameters. By
default, external config lookup is disabled.
<jolokia:log> child element may be specified to configure one of the supported log handles used by Jolokia. These are:
-
stdout- log to standard output -
quiet- don’t log -
jul- usejava.util.logging -
slf4j- use Simple Logging Framework for Java, which is usually combined with Logback or Log4j2. -
log4j2- use Apache Logging Log4j2 directly -
commons- use Apache Commons Logging
<jolokia:mbean-server>
With <jolokia:mbean-server> the Jolokia specific
MBeanServer can be specified. This is especially useful for
adding it to <context:mbean-export>
so that this MBeanServer is used for registering
@ManagedResource and
@JsonMBean. Remember, MBean registered at
the Jolokia MBeanServer never will show up in an JSR-160 client
except when annotated with @JsonMBean.
See JMX Support for more information.
<beans xmlns="http://www.springframework.org/schema/beans"
       xmlns:xsi="http://www.w3.org/2001/XMLSchema-instance"
       xmlns:jolokia="http://www.jolokia.org/jolokia-spring/schema/config"
       xmlns:context="http://www.springframework.org/schema/context"
       xsi:schemaLocation="
           http://www.springframework.org/schema/beans https://www.springframework.org/schema/beans/spring-beans.xsd
           http://www.springframework.org/schema/context https://www.springframework.org/schema/context/spring-context.xsd
           http://www.jolokia.org/jolokia-spring/schema/config https://www.jolokia.org/jolokia-config.xsd">

  <context:mbean-export server="jolokiaServer"/>
  <jolokia:mbean-server id="jolokiaServer"/>

</beans>
~